- Docs
- Run a node
- Running a local testnet
Running a local testnet
This guide explains how to run a local Archway testnet. If you have not installed an Archway node before, please follow this guide here.
Create the required directories
To have a working test network we need at least two validator nodes.
First, let's create a directory to keep all nodes' data in an organized way:
mkdir testnetcd testnetSince we will create two nodes in this testnet, let's:
Create a directory for the first node that will call node1.
mkdir -p node1Create a directory for the second node, that we will call node2:
mkdir -p node2Initialize the first node
From the testnet folder, get inside the node1 folder with:
cd node1Initiate node1 with the chain name:
archwayd init node1 --chain-id my-chain --home ./node1After launching the command, a similar message is shown:
{"app_message":{"auth":{"accounts":[],"params":{"max_memo_characters":"256","sig_verify_cost_ed25519":"590","sig_verify_cost_secp256k1":"1000","tx_sig_limit":"7","tx_size_cost_per_byte":"10"}},"authz":{"authorization":[]},"bank":{"balances":[],"denom_metadata":[],"params":{"default_send_enabled":true,"send_enabled":[]},"supply":[]},"capability":{"index":"1","owners":[]},"crisis":{"constant_fee":{"amount":"1000","denom":"stake"}},"distribution":{"delegator_starting_infos":[],"....Create a key to hold your account. An account consists of a pair of a public key and a private key. These keys are then stored in an object called a keyring.
archwayd keys add node1-account --home ./node1After running this command, you will be asked to create a keyring passphrase.
Once you have created a passphrase, you will see a similar message:
name: node1-account type: local address: archway10n7srpt0x859ghelguwxvxwh84vdsryy8ptel8 pubkey: '{"@type":"/cosmos.crypto.secp256k1.PubKey","key":"A6+usIOWVm2K45jsAzjhrRWDzDWAL"}' mnemonic: "Info
Please safely store your mnemonic as it is required for recovering your account
Initialize the second node
Initialize the node with the same chain name that we used for the main node earlier.
From the testnet folder, go inside the node2 folder using:
cd node2archwayd init node2 --chain-id my-chain --home ./node2Add keys to node2:
archwayd keys add node2-account --home ./node2Please take note of the address of node2, as you will need it.
Set up the genesis file
Now, you should add the addresses of node1 and node2 to the Genesis file so that those nodes have enough tokens to start validating in the network.
- From the node1 folder open the genesis file:
nano ./node1/config/genesis.json- Replace all the words stake with aarch, which is the name of the token for the local testnet.
You can also use sed to replace stake with aarch:
sed -i -e "s_\S*stake\"_\"aarch\"_" ./node1/config/genesis.json- Go to the
"app_state":section of the config/genesis.json file. In the"accounts": []section, add the data for the two accounts associated with node1 and node2.
For example:
"accounts": [ { "@type": "/cosmos.auth.v1beta1.BaseAccount", "address": "archway17js24qztj05ve2gmgqzvgcsvufeq2me3kd2pnj", "pub_key": null, "account_number": "0", "sequence": "0" }, { "@type": "/cosmos.auth.v1beta1.BaseAccount", "address": "archway195uq5lz84udvc8u5hxr4jsp0eg6x54a2jmq3zv", "pub_key": null, "account_number": "0", "sequence": "0" } ]You can also use sed to replace accounts with:
sed -i -e"s_\"accounts\": *\[\]_\"accounts\": [{\"@type\":\"/cosmos.auth.v1beta1.BaseAccount\",\"address\":\"archway17js24qztj05ve2gmgqzvgcsvufeq2me3kd2pnj\", \"pub_key\":null,\"account_number\": \"0\", \"sequence\": \"0\"},{\"@type\":\"/cosmos.auth.v1beta1.BaseAccount\",\"address\":\"archway195uq5lz84udvc8u5hxr4jsp0eg6x54a2jmq3zv\",\"pub_key\":null,\"account_number\": \"0\",\"sequence\": \"0\"}]_" ./node1/config/genesis.json- Go to the
"bank":section of the config/genesis.json file. In the"balances": []section, add the balances for node1 and node2.
For example:
"balances": [ { "address": "archway17js24qztj05ve2gmgqzvgcsvufeq2me3kd2pnj", "coins": [ { "denom": "aarch", "amount": "100000000000000000000000000" } ] }, { "address": "archway195uq5lz84udvc8u5hxr4jsp0eg6x54a2jmq3zv", "coins": [ { "denom": "aarch", "amount": "100000000000000000000000000" } ] } ],You can also use sed to replace balances with:
sed -i -e"s_\"balances\":*\[\]_\"balances\":[{\"address\":\"archway17js24qztj05ve2gmgqzvgcsvufeq2me3kd2pnj\",\"coins\":[{\"denom\":\"aarch\",\"amount\":\"100000000000000000000000000\"}]},{\"address\":\"archway195uq5lz84udvc8u5hxr4jsp0eg6x54a2jmq3zv\",\"coins\":[{\"denom\":\"aarch\",\"amount\":\"100000000000000000000000000\"}]}]_" ./node1/config/genesis.jsonAlternative way:
Another way to add the genesis accounts would be to add the validator key into the genesis.app_state.accounts array in the genesis file.
For the first node, you would launch the following command in the node1 folder:
archwayd genesis add-genesis-account "$(archwayd keys show node1-account -a --home ./node1)" 100000000000000000000000000aarch --home ./node1For the second node, you would launch the following command in the node2 folder:
archwayd genesis add-genesis-account "$(archwayd keys show node1-account -a --home ../node2/node2)" 100000000000000000000000000aarch --home ./node1Submit the genesis transaction
When running a Cosmos SDK-based blockchain, new validators need to submit a genesis gentx transaction to the network to become a validator. The genesis transactions is the first transaction of the local chain, while the genesis collect-gentxs command collects all the gentx transactions submitted by potential validators and creates a new genesis file that includes these transactions.
The command typically involves the following steps:
- Validators submit their gentx transactions to the network.
- The collect-gentxs command is run on each node in the network.
- The command collects all the gentx transactions that have been submitted.
- The command generates a new genesis file that includes all the collected gentx transactions.
- The new genesis file is distributed to all the nodes in the network.
- By using the collect-gentxs command, the network can ensure that all the validators are included in the genesis file and can start validating the network from the beginning of the blockchain.
Now you will generate the genesis transaction to create the validator. The gensesis transaction is the first transaction of the local chain:
archwayd genesis gentx node1-account 100000000000000000000000aarch --chain-id my-chain --fees 100000000000000000000aarch --home ./node1archwayd genesis collect-gentxs --home ./node1Fix port conflicts
As you are about to run the nodes on the same machine, you will need to resolve any port conflicts. Otherwise, errors such as already in use ports are returned.
To proceed, we can either:
- Run each node in isolated environments, such as Docker containers. (you can have a look at the Docker instruction in the node installing section).
- Edit the app.toml and conf.toml files to setup different port numbers
- Use sed for example with:
sed -i.bak -e "s_^address *= \"0\.0\.0\.0:9090\"$_address = \"0\.0\.0\.0:9092\"_"./node2/config/app.tomlChanges to the app.toml file
In this section we look deeper into changing the app.toml and conf.toml files to fix port conflicts. The first file we will change is the app.toml file. Go to this file by running the below commands:
nano ./node2/config/app.tomlUnder the gRPC Configuration [grpc] section you will see the address settings. Change the value to the below:
enable = trueaddress=“0.0.0.0:9092”Under the gRPC Web Configuration [grpc-web] section you will see the address settings. Change the value to the below:
address=“0.0.0.0:9093”
The network implements a minimum price of gas preventing a transaction to go through with a gas price lower than the value set. There is a corresponding value that is configurable within your node minimum-gas-prices that should be set to a value. This value can be 0 or the corresponding minimum gas price set by the network which you can find via:
mainnet
testnet
$(archwayd q rewards estimate-fees 1 --node 'https://rpc.mainnet.archway.io:443' --output json | jq -r '.gas_unit_price | (.amount + .denom)')Try it:
archwayd q rewards estimate-fees 1 --node 'https://rpc.mainnet.archway.io:443' --output json | jq -r '.gas_unit_price | (.amount + .denom)'Save the file after making the above changes.
Changes to the config.toml file
The next file we will change is the config.toml file. Go to this file by running the below commands after you have made the first edits above:
nano ./node2/config/config.tomlUnder the RPC Server Configuration Options [rpc] you will see the laddr settings. Change the value to the below:
laddr=“tcp://127.0.0.1:10002”
Then find the pprof_laddr settings and change it to the value below:
pprof_laddr=“localhost:6062”
The last thing you need to change in this file is the listen port for p2p connections. This is under the P2P Configuration Options [p2p] and we will change the laddr value to the below:
laddr=“tcp://0.0.0.0:20002”
Save the file after making the above changes.
Copy the genesis file
In order to join the local test network, we need to use the same genesis file of that network. The genesis file contains all the information and parameters about the initial state of our blockchain.
Copy the genesis file from the node1 folder and replace node2's genesis file with it.
Make sure you are in the /testnet directory before running the below command.
cp node1/node1/config/genesis.json node2/node2/config/genesis.jsonStart the first validator node
In the node1 folder, start the fist validator node:
archwayd start --home ./node1Afer the node starts running, you should see a message like below:
8:49PM INF starting node with ABCI Tendermint in-processInfo
In case you see the error message listen tcp 0.0.0.0:9090: bind: address already in use, open your app.toml and change the tcp address to another port(for example 9091) by updating the app.toml with address = "0.0.0.0:9091" under both sections grpc-web and grpc
You have created the first node! Now let's create a second node to connect to our testnet.
Find the seeds' addresses
To join a p2p network, you need the addresses of nodes to which you can connect to. You can find the address of node1 by running the following command:
archwayd statusInfo
Please note that this command shows the status of the running node on default port. If we want to get the status of a specific node, we need to give it the IP address and the port it is listening to.
For example: archwayd status -n tcp://localhost:10002 for node2 that we just configured.
This command gives an output like the following:
{ "NodeInfo": { "protocol_version": { "p2p": "8", "block": "11", "app": "0" }, "id": "a118197af3c66781faa0299633cc59a1622d27e3", "listen_addr": "tcp://0.0.0.0:26656", "network": "chain-main", "version": "", "channels": "40202122233038606100", "moniker": "node1", "other": { "tx_index": "on", "rpc_address": "tcp://127.0.0.1:10003" } }, "SyncInfo": { ... }, "ValidatorInfo": { ... }}All we need is:
- The id which in our example is a118197af3c66781faa0299633cc59a1622d27e3
- The host name and its listening port listen_addr which here is:
tcp://0.0.0.0:26656
Start the second validator node
Since you are running the node on your local machine, the IP address is set to 0.0.0.0, which refers to localhost. Therefore, you can use either localhost or 127.0.0.1.
Now, in node2 run the following command to let the second node join the network:
archwayd --home ./node2 start --p2p.seeds a118197af3c66781faa0299633cc59a1622d27e3@localhost:26656Using gex to visualize the network status
Gex is a real time in-terminal explorer for Cosmos SDK blockchains. Gex displays blocks, transactions, validator, network status, and more information. Use the GEX block explorer to see the status of peers, connection, version, and other useful information to have a quick peek into your own node.
Let's quickly install Gex to see the status of our node.
go install github.com/cosmos/gex@latestTo launch GEX in your terminal window, type:
gexBefore connecting to node2, our gex would have looked like this:

As you can see, the number of peers is zero. After starting the second now, gex should now look like this:
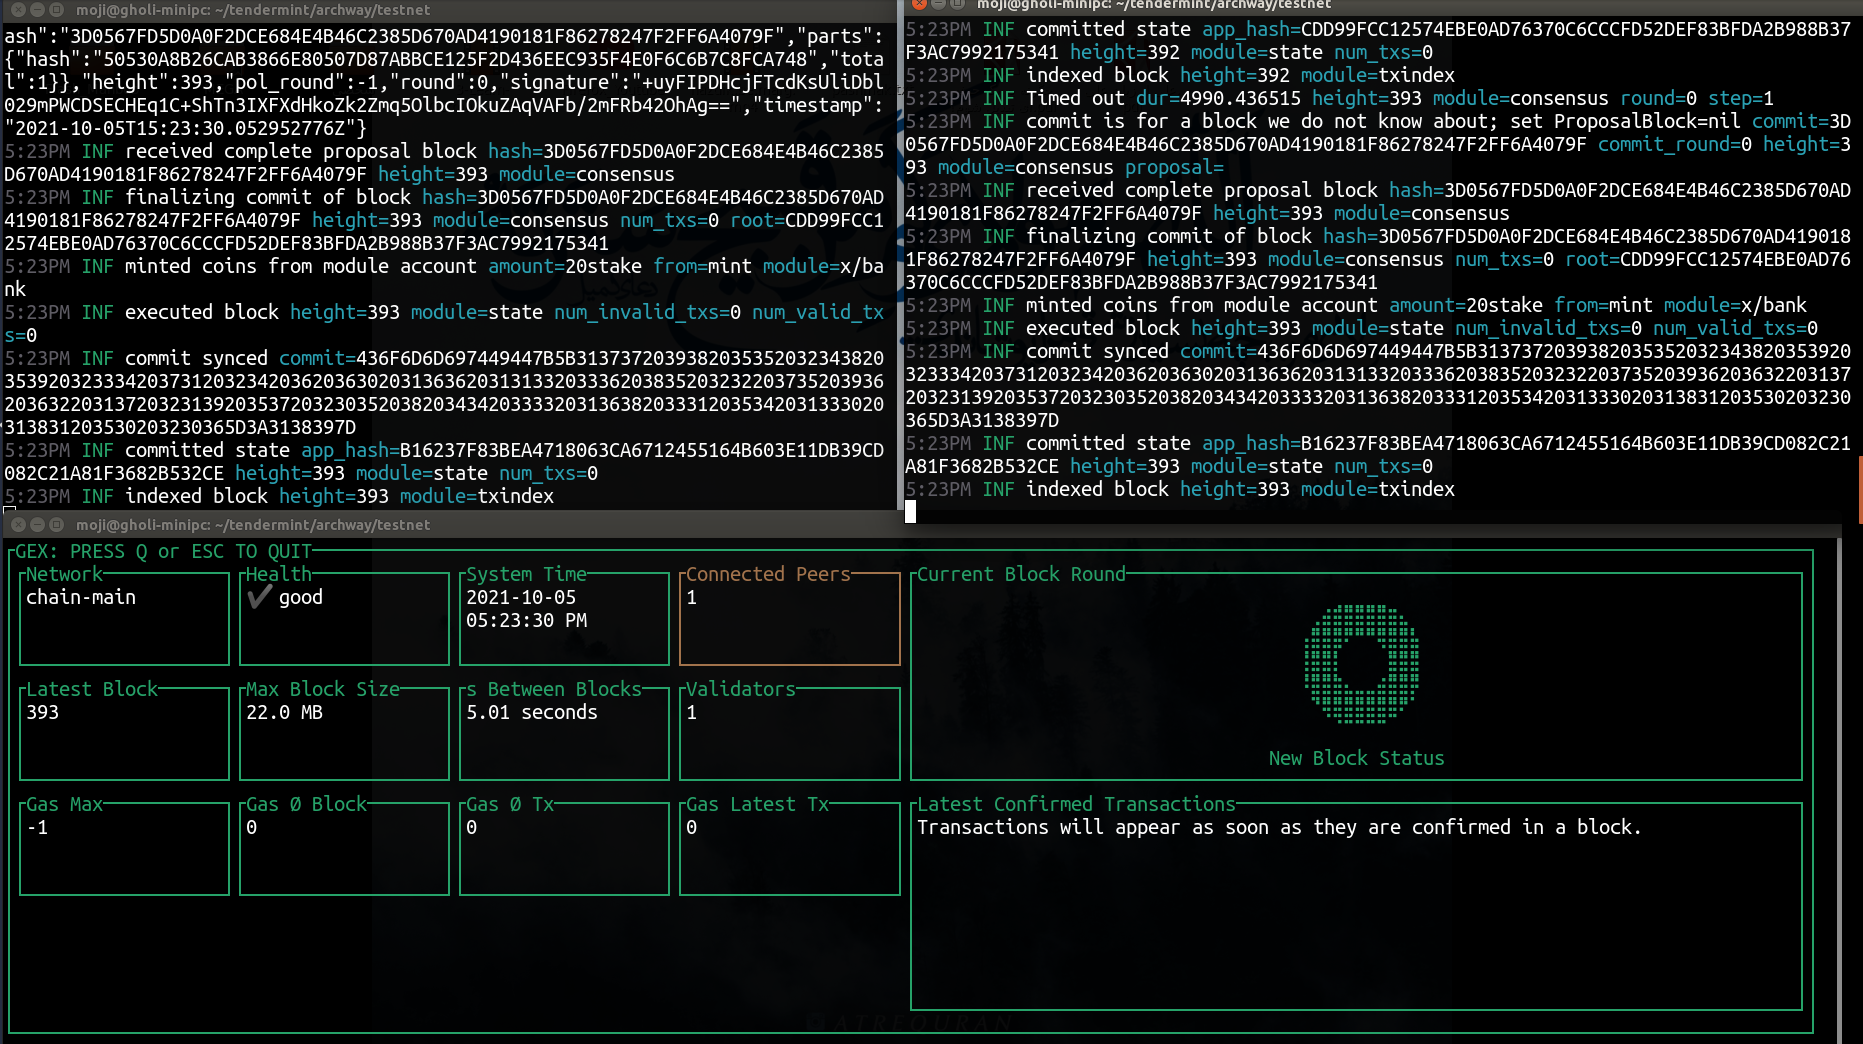
So now you have successfully joined a running network.
Running a local testnet with docker
Docker simplifies the process of setting up a single-node local testnet.
First download the repository:
git clone [email protected]:archway-network/archway.gitcd archwayInfo
We need to change the docker image in the docker-compose.yaml file. The image name should be "archwayd-dev". The final value should therefore be "ghcr.io/archway-network/archwayd-dev:${TAG}".
To set up a new local testnet, execute the following command:
make localnetTo continue from the last local testnet used, execute the following:
make localnet-continue